You just got a "yes." The client loved your portfolio, the pricing worked, and they're ready to book. This is the moment most photographers celebrate — and then fumble. Because what happens in the next 48 hours determines whether this client becomes your biggest referral source or the one who leaves a mediocre review because "communication could have been better."
Client onboarding isn't glamorous. It's not the part of photography anyone dreams about. But it's the part that separates the photographers who are constantly chasing down details from the ones who show up to every shoot completely prepared, with clients who trust them completely.
The first 48 hours after booking set the tone for the entire client relationship. A smooth onboarding process tells your client: I'm organized, I'm professional, and you're in good hands.
Here's the 6-step onboarding process that professional photographers use to eliminate back-and-forth, build trust from day one, and make sure nothing falls through the cracks between booking and shoot day.
Step 1: Send the Contract Immediately
Not tomorrow. Not "when you get a chance." The moment a client says yes, you send the contract. Why? Because excitement fades. Life gets busy. The longer you wait, the more likely they are to second-guess, shop around, or simply forget to sign.
A fast contract also signals professionalism. When a client gets a polished, branded contract within minutes of agreeing to book, it reinforces their decision. It tells them they made the right choice.
Your contract should cover the essentials: date, location, package details, pricing, payment schedule, cancellation policy, and image usage rights. It doesn't need to be 15 pages of legal jargon — it needs to be clear, fair, and easy to sign electronically.
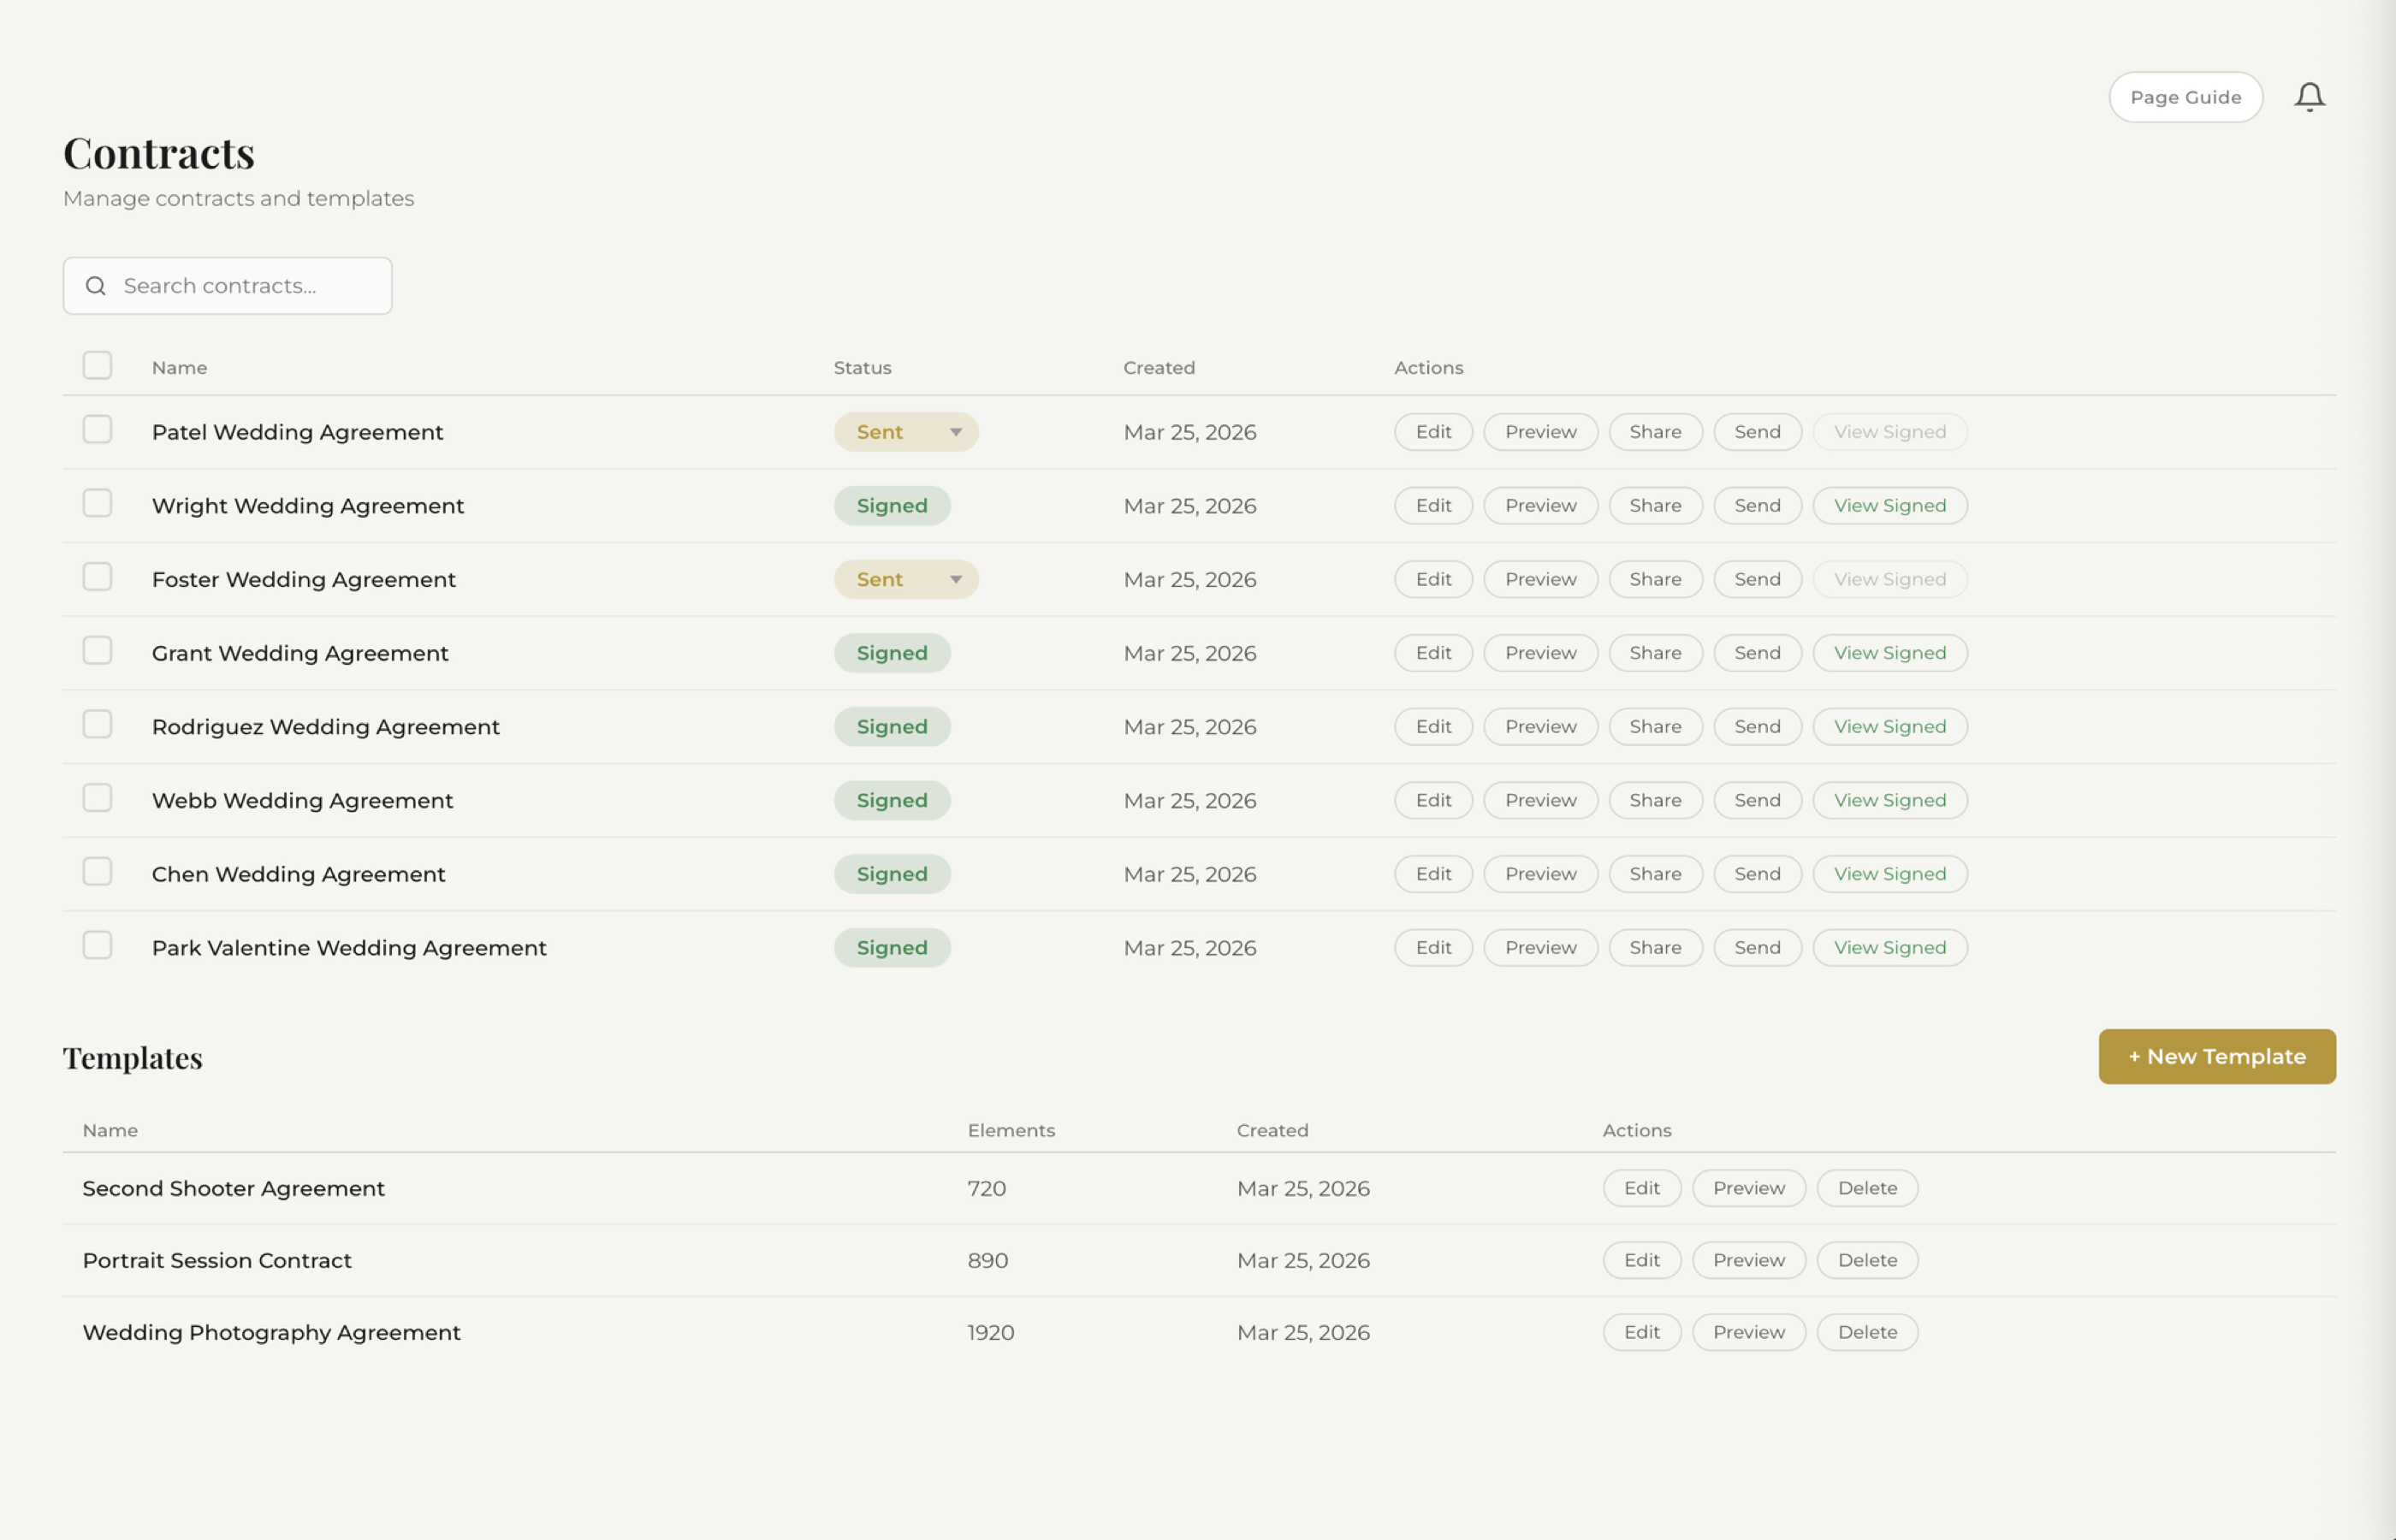
See how fstop's smart contracts work →
How Fstop handles this: Fstop comes with photography-specific contract templates that auto-fill client details, event dates, and package pricing using smart variables. One click sends the contract with a built-in e-signature. No printing, no scanning, no chasing. The client signs from their phone in under two minutes.
Step 2: Collect the Retainer
The contract and retainer should arrive together — or the retainer request should follow immediately after signing. A signed contract without a payment isn't a booking. It's a maybe.
The retainer (or booking fee, or deposit — whatever you call it) does two things. First, it locks in the date. Until money changes hands, that date is still available to anyone else who inquires. Second, it creates commitment. Psychology is simple here: once someone has paid, they're invested. They stop shopping around.
Most photographers charge 25-50% of the total package as a retainer, with the balance due 2-4 weeks before the event. Whatever your structure, make it crystal clear in the contract and make it painless to pay.
How Fstop handles this: Invoices in Fstop support retainer + final payment splits out of the box. You set the retainer amount when you create the invoice, and the client pays through their portal. Automated payment reminders handle the follow-up so you never have to send an awkward "just checking in on that payment" email.
Step 3: Send a Welcome Email
Once the contract is signed and the retainer is paid, the client enters a new phase of your relationship. They're no longer a lead — they're a booked client. And they need to feel that shift.
A welcome email does several things at once. It confirms the booking. It sets expectations for what happens next. It gives them a single point of reference they can come back to. And it makes them feel taken care of.
A good welcome email includes:
- A genuine thank-you — acknowledge their trust in choosing you
- What happens next — a brief overview of your process (questionnaire, timeline, etc.)
- Key dates — when to expect the questionnaire, when the final payment is due, when you'll do a pre-shoot check-in
- How to reach you — preferred contact method and typical response time
- Portal access — if you use a client portal, give them the link and explain what they'll find there
This email doesn't need to be long. It needs to be warm, clear, and reassuring. The client just committed thousands of dollars to you. Make them feel good about it.
How Fstop handles this: Fstop's email templates let you create a welcome email once and reuse it for every client. Smart variables auto-fill the client's name, event date, package, and portal link. You can send it directly from your connected Gmail — so the client sees your real email address, not a noreply@someplatform.com.
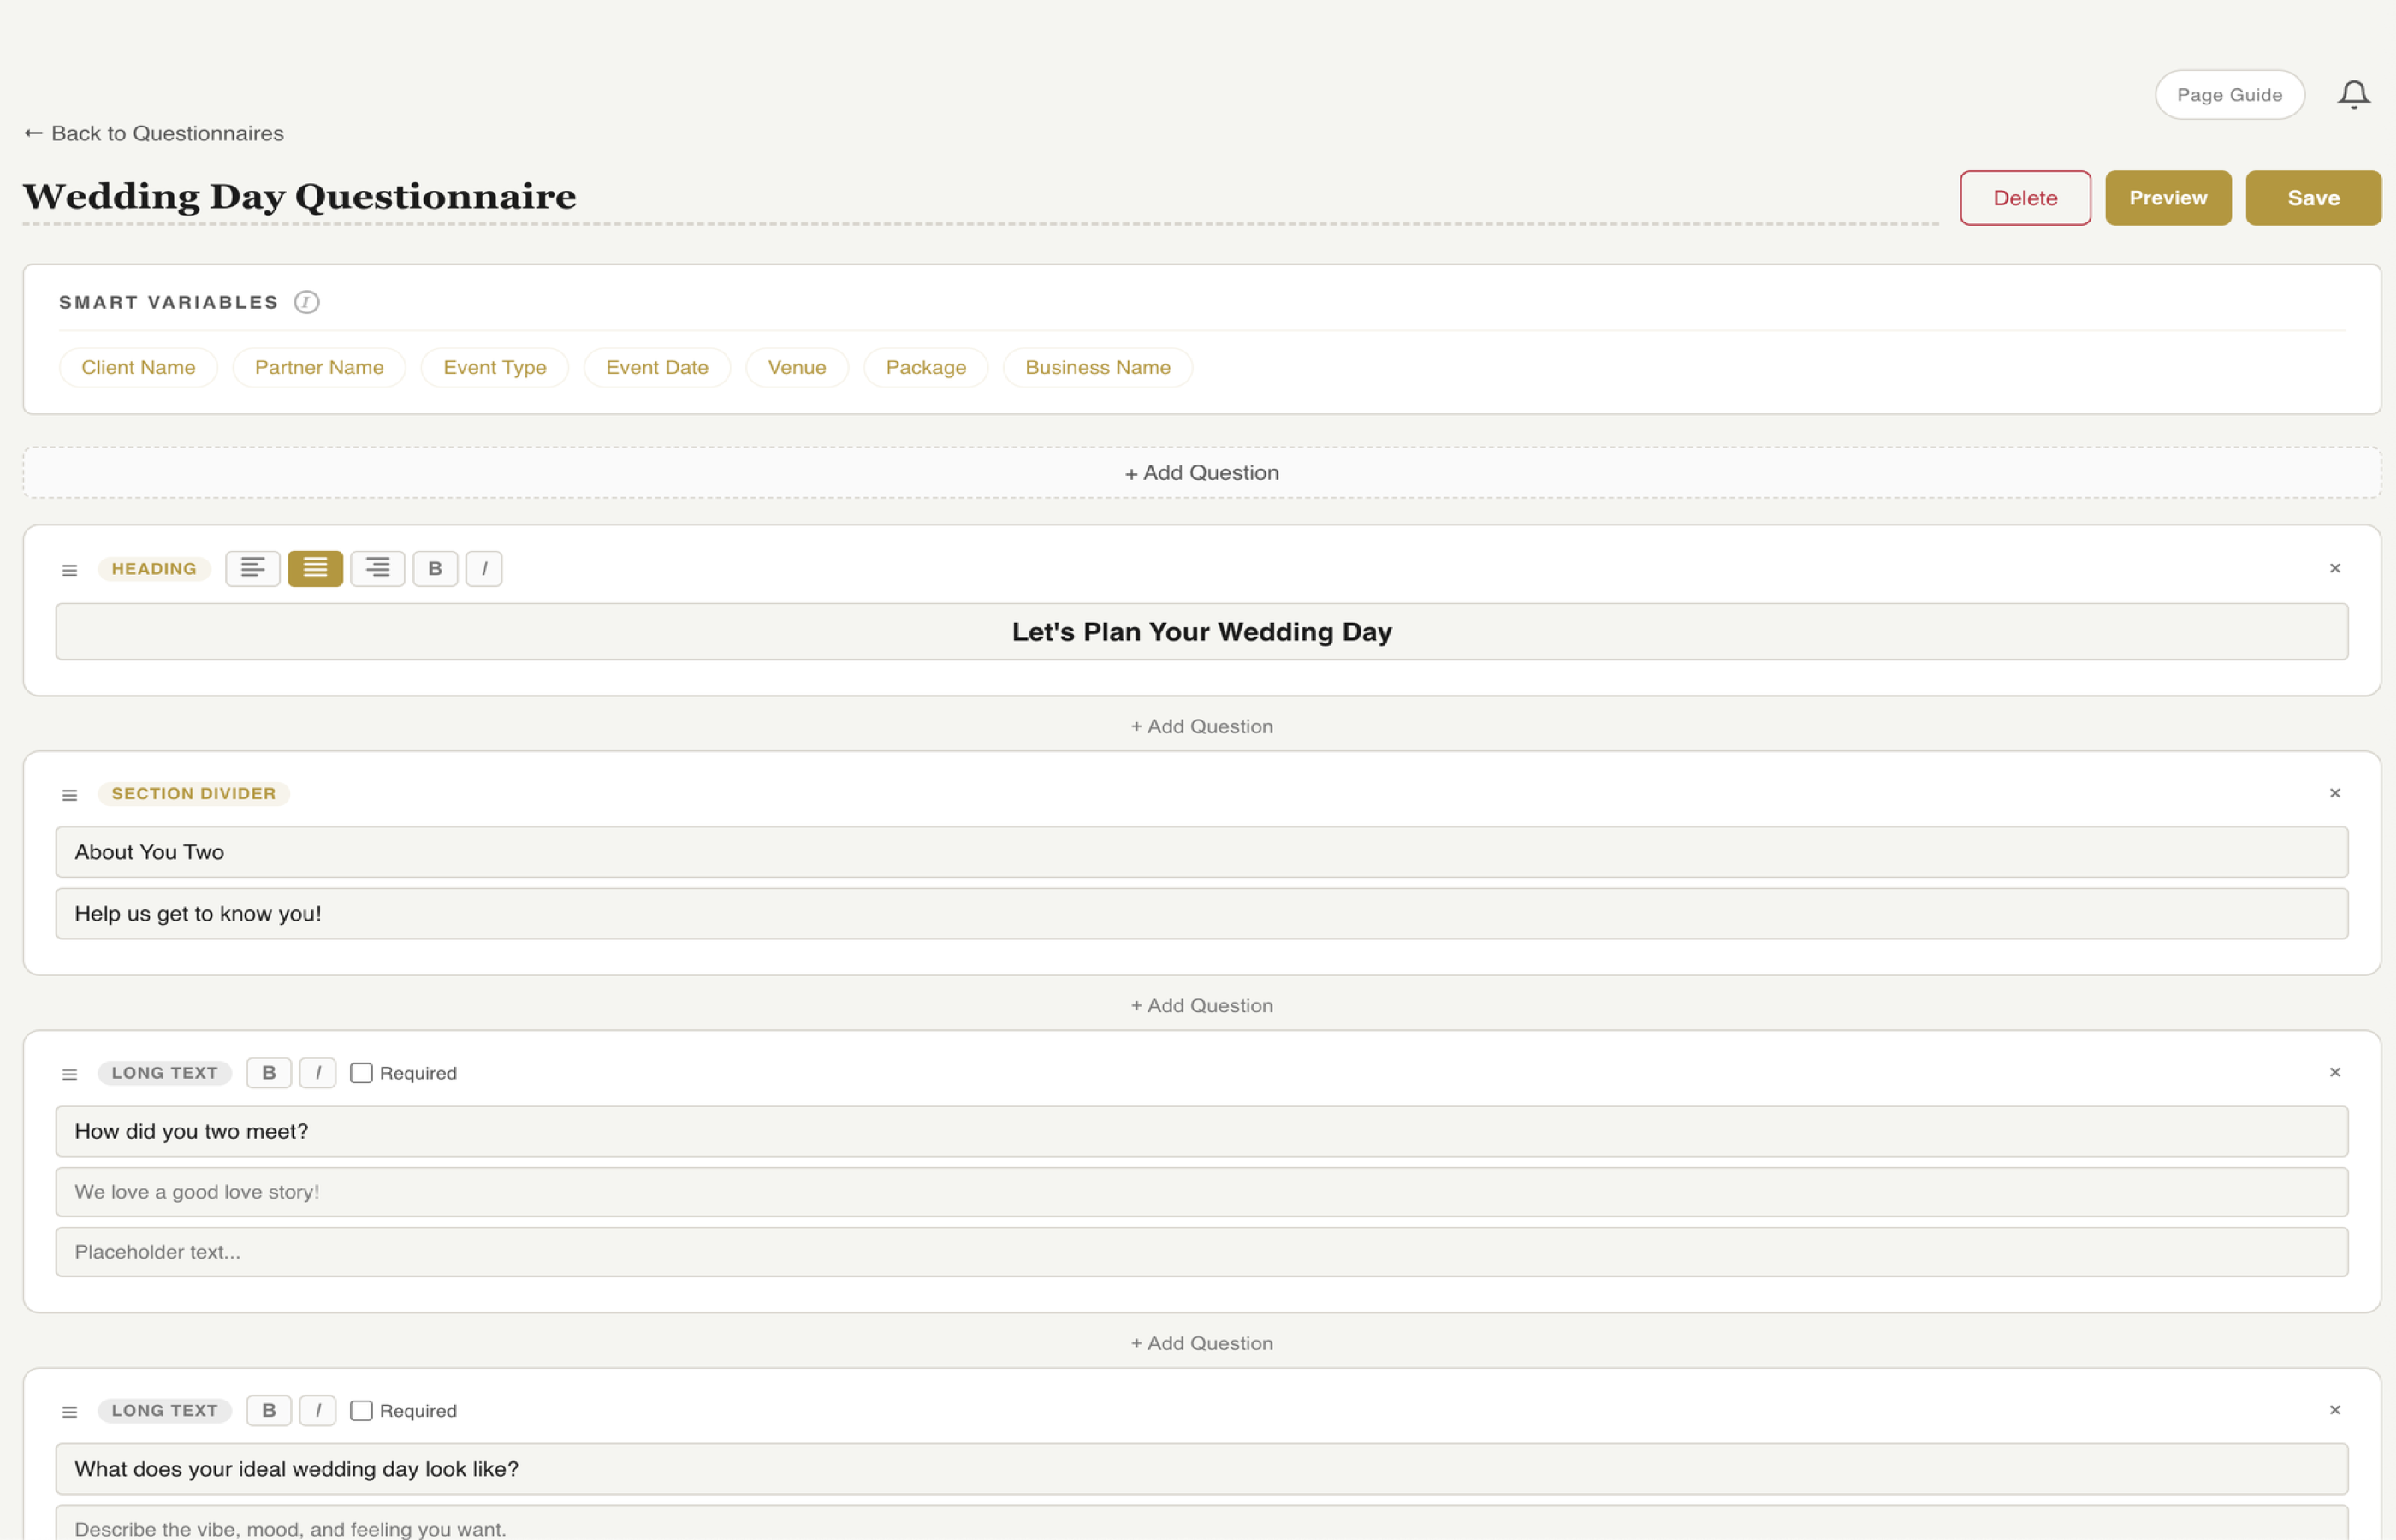
Step 4: Send the Questionnaire
This is the step that separates prepared photographers from ones who show up and wing it. A client questionnaire collects all the details you need to do your job well — without requiring a dozen back-and-forth emails over the following weeks.
For wedding photographers, this typically covers:
- Venue details and addresses (ceremony, reception, getting-ready locations)
- Key family members and VIPs to photograph
- Must-have shots and specific moments they care about
- Vendor contacts (planner, florist, DJ, videographer)
- Timeline preferences and any scheduling constraints
- Special traditions, surprises, or cultural considerations
- Any anxiety or concerns about being photographed
For portrait, branding, or commercial shoots, adapt accordingly — but the principle is the same. Get the information early, get it in writing, and get it in one place.
Timing matters here. Send the questionnaire too early and the client won't have answers yet. Send it too late and you're scrambling. For weddings, 4-8 weeks before the event is the sweet spot. For shorter-turnaround shoots, send it right after booking.
See how fstop's questionnaire builder works →
How Fstop handles this: Fstop's questionnaire builder lets you create reusable questionnaire templates with custom fields — text, dropdowns, multi-select, long-form answers. Send it to the client through their portal, and their responses are saved directly to their client record. No Google Forms. No copy-pasting answers into a spreadsheet. Everything lives in one place.
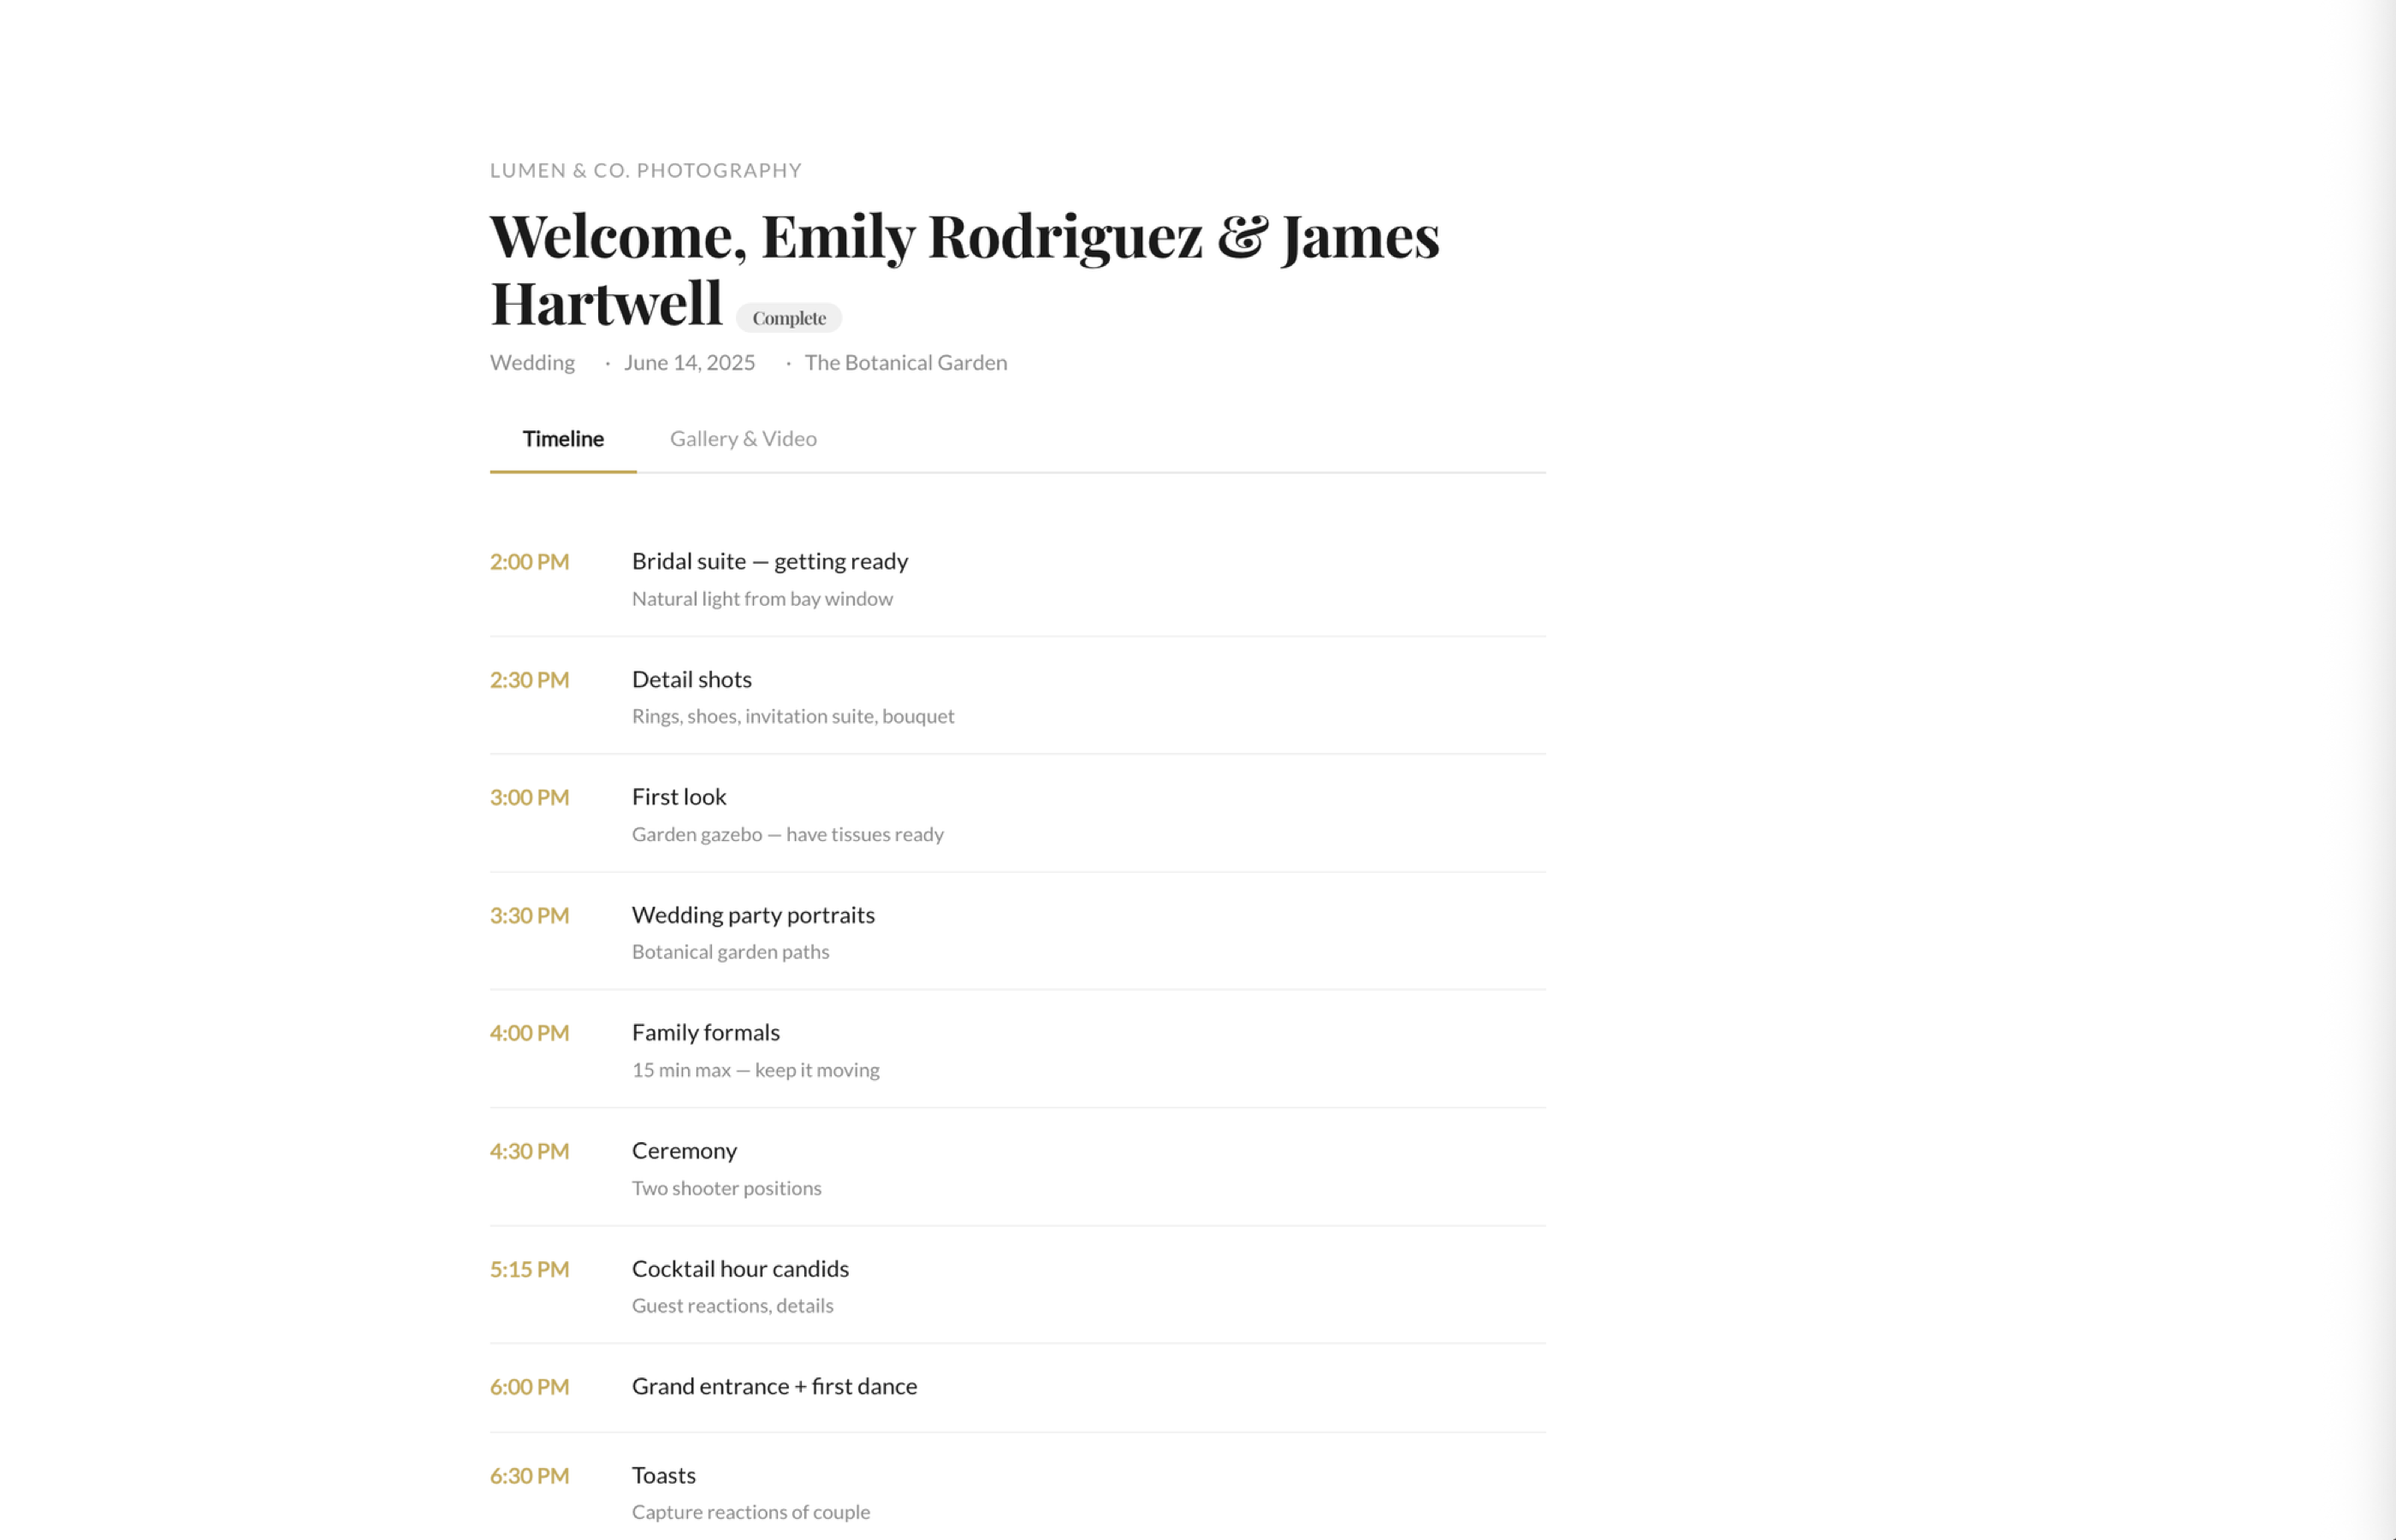
Step 5: Build and Share the Timeline
A timeline turns a collection of details into an actual plan. For wedding photographers, this is non-negotiable. For portrait and commercial photographers, even a simple shot list with time blocks makes a dramatic difference in how the session flows.
Your timeline should account for:
- Getting-ready coverage start time
- First look or pre-ceremony portraits
- Ceremony start and end
- Family formals and group shots (with a specific list of groupings)
- Cocktail hour coverage
- Reception events: entrance, first dance, toasts, cake, bouquet toss
- Buffer time between segments (things always run late)
- Golden hour timing for couples portraits
The key is sharing this timeline with the client — not just building it for yourself. When the client can see the plan, they feel confident. They can share it with their planner, their bridal party, their parents. Everyone knows what's happening and when.
See how fstop's client portal works →
How Fstop handles this: Fstop's timeline builder lets you create detailed, time-blocked itineraries for each event. The finished timeline is shared automatically through the client portal — so the client, their planner, and anyone else involved can access it anytime without emailing you for a copy. Update it once, and everyone sees the latest version.
Step 6: Pre-Shoot Check-In
One to two weeks before the event, reach out. This isn't a long conversation. It's a quick touchpoint that serves three purposes.
First, it catches any last-minute changes. Venues change. Timelines shift. Uncle Larry who was supposed to do a reading dropped out. A 5-minute email exchange now saves you from being blindsided on the day.
Second, it confirms logistics. Parking situation. Where you're meeting. Who the day-of contact is if you can't reach the client. Whether the final payment has been taken care of.
Third — and this is the one photographers underestimate — it calms nerves. Clients get anxious before big events. A confident, relaxed check-in from their photographer is reassuring. It reminds them that a professional is handling this part, and they can focus on enjoying the day.
Keep it simple:
- Confirm the date, start time, and location
- Ask if there are any changes to the timeline or shot list
- Confirm the final payment (if applicable)
- Remind them you're excited and ready
How Fstop handles this: Use Fstop's email templates to create a pre-shoot check-in email that you send to every client. Smart variables pull in the event date, location, and any outstanding balance. Pair it with a task reminder so you never forget to send it — Fstop's task system lets you set reminders relative to the event date.
Why Onboarding Matters More Than You Think
Most photographers focus their energy on two moments: getting the booking and delivering the gallery. Everything in between gets treated as admin — necessary but uninspiring.
That's a mistake. The onboarding phase is where trust is either built or broken. A client who receives a polished contract within minutes, a clear welcome email, a thoughtful questionnaire, and a detailed timeline thinks: this photographer has their act together. They relax. They refer their friends. They leave glowing reviews.
A client who has to chase you for a contract, never gets a questionnaire, and shows up to the wedding not knowing the timeline thinks: I hope this works out. Even if you deliver incredible photos, the experience was stressful. And experience is what people remember.
The photographers who are fully booked year after year aren't always the most talented — they're the most organized. They've built a system that makes every client feel like the only client. And that system starts with onboarding.
Build Your Onboarding System Once
The best part about a structured onboarding process is that you build it once and use it for every single client. Your contract templates, welcome email, questionnaire, and check-in email are all reusable. The only thing that changes is the client-specific details — and if your CRM uses smart variables, even those fill themselves in.
What used to take 2-3 hours of manual work per client becomes a 10-minute process. Send the contract. Send the invoice. Send the welcome email. Queue the questionnaire. Build the timeline. Set the check-in reminder. Done.
That's not just efficiency. That's hours you get back every month — hours you can spend shooting, editing, marketing, or simply not working.
Try Fstop for 7 Days
Contracts, questionnaires, timelines, client portal — everything you need to onboard clients like a pro. Built by a photographer. Plans from $19.99/mo.
START YOUR TRIAL