Your contact form is the front door to your photography business. Every inquiry starts there. But most photographers either use their website platform's default form (which dumps submissions into email where they get lost) or skip the form entirely and just list an email address.
Neither is great. What you want is a branded form that matches your website, captures the right information, and sends inquiries straight into a system where you can actually track and respond to them.
This guide walks you through building a custom contact form in fstop and embedding it on your website. The whole process takes about ten minutes.
1 Open the Form Builder
Head to the Inquiries page in fstop and click the Connect Form button. You will see two options: a webhook URL (for connecting an existing form) and the Form Builder. Click Form Builder.
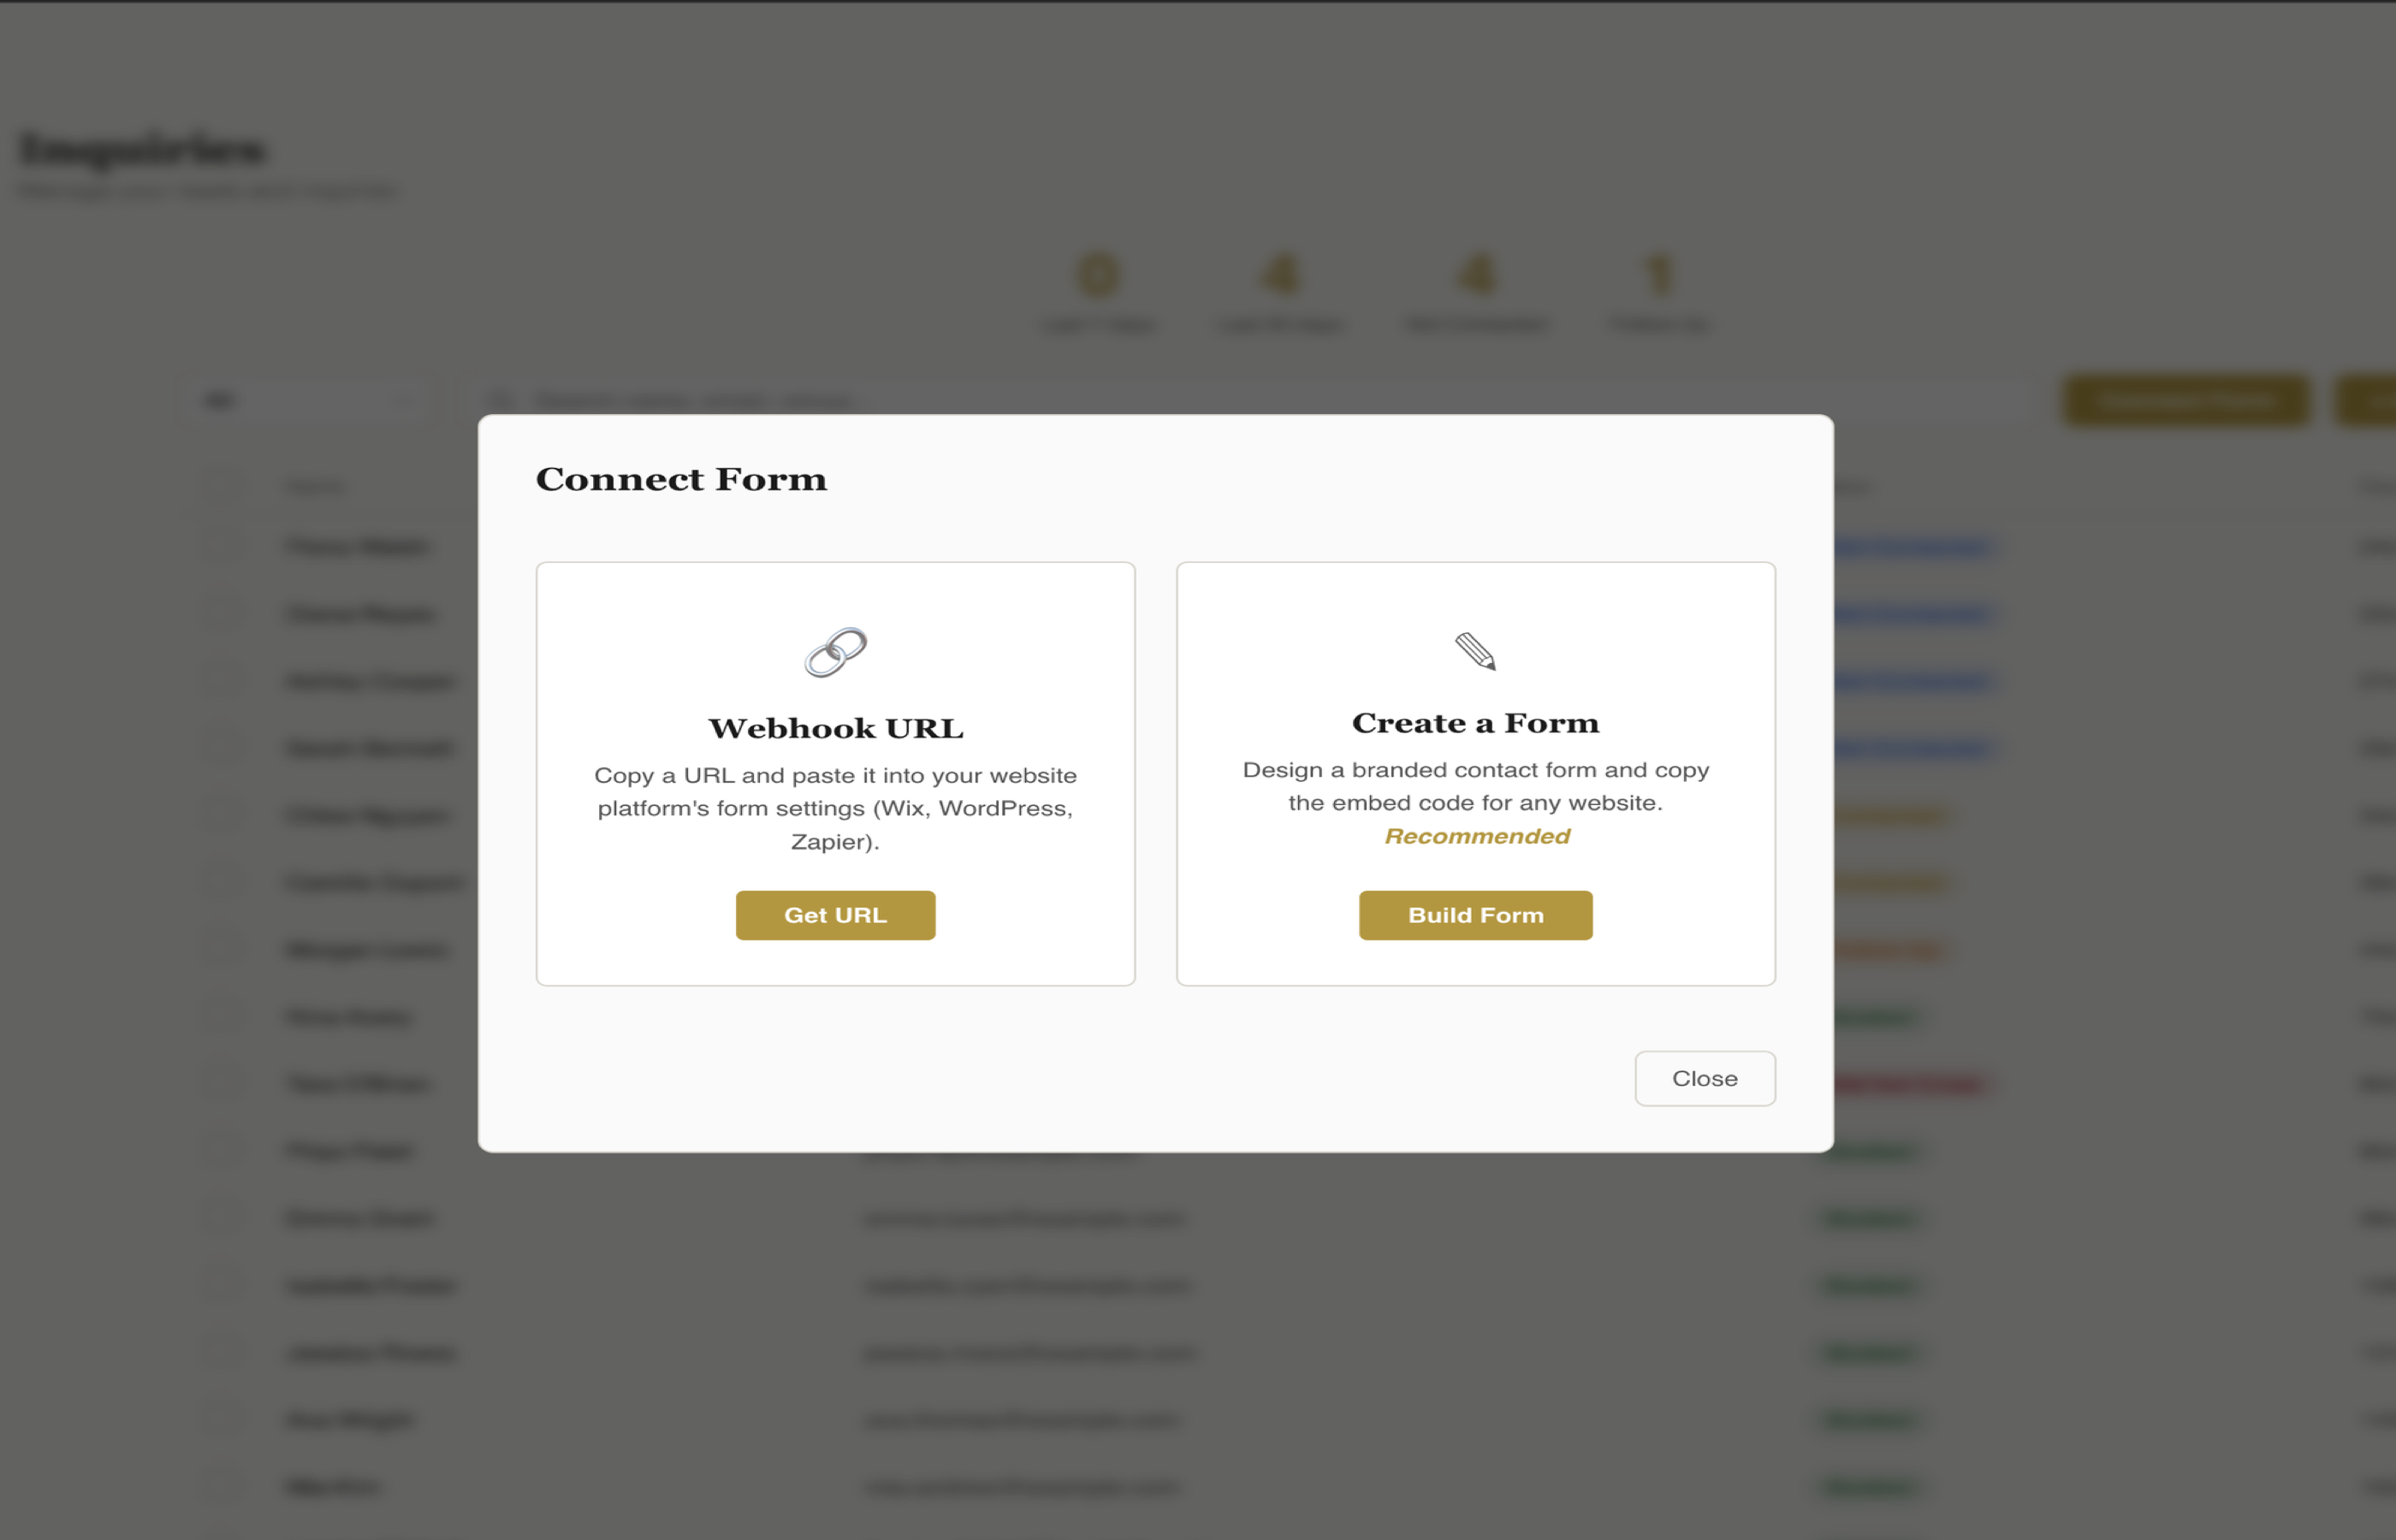
The Connect Form modal gives you two ways to get inquiries into fstop.
The webhook option is useful if you want to keep your existing website form (from Squarespace, Wix, or WordPress) and just pipe submissions into fstop. But the Form Builder gives you full control over the look and fields, so that is what we will use here.
2 Choose Your Fields
The builder opens with default fields: Name, Email, Phone, Event Type, Event Date, and Message. You can customize all of them:
- Toggle fields on or off — don't need Phone? Switch it off. Want to add a Package dropdown? Switch it on.
- Drag to reorder — put the most important fields at the top. The order in the builder is the order on your live form.
- Edit labels and placeholders — change "Event Type" to "Session Type" or "What are you looking for?" — whatever fits your voice.
- Mark fields as required — Name and Email are always required (you need them to respond). Everything else is your call.
- Edit dropdown options — for select fields like Event Type and Package, you can add, remove, and reorder the dropdown choices.
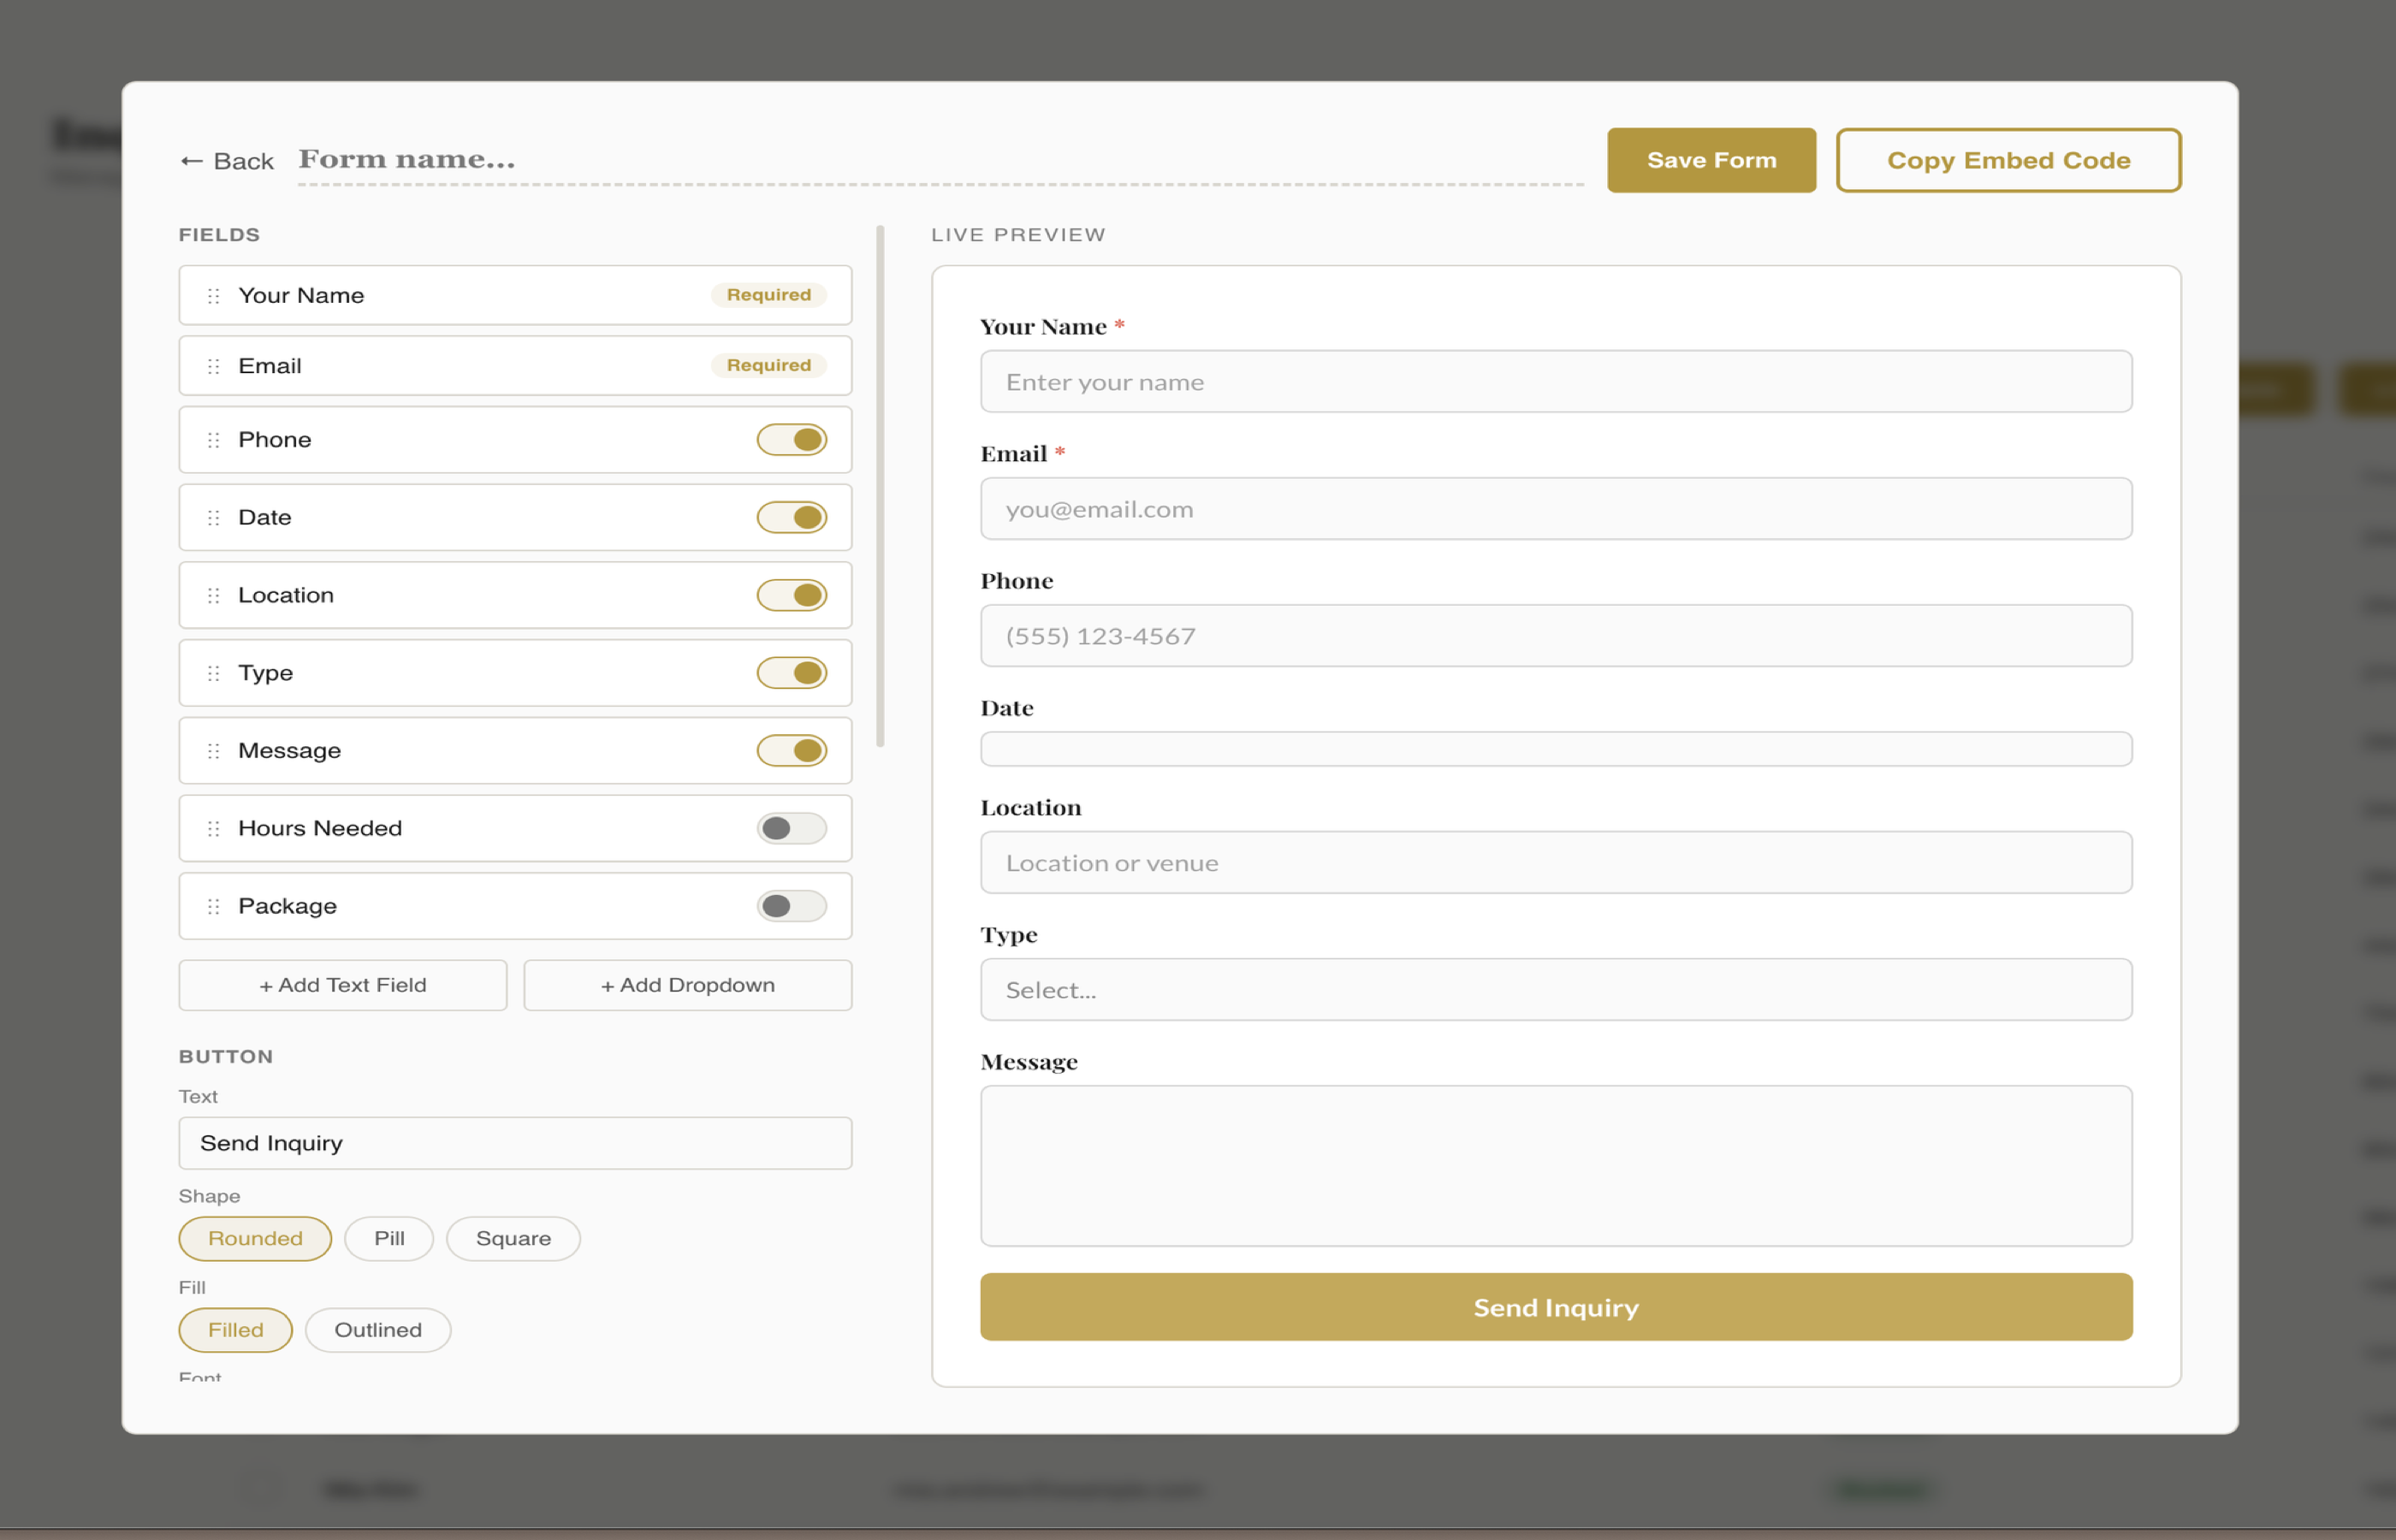
Drag to reorder, toggle on/off, and edit any field. The live preview updates in real time on the right.
Tip: Keep your form short. The more fields you require, the fewer people will fill it out. Name, email, event date, and a message field is enough to start a conversation. You can always ask for details later.
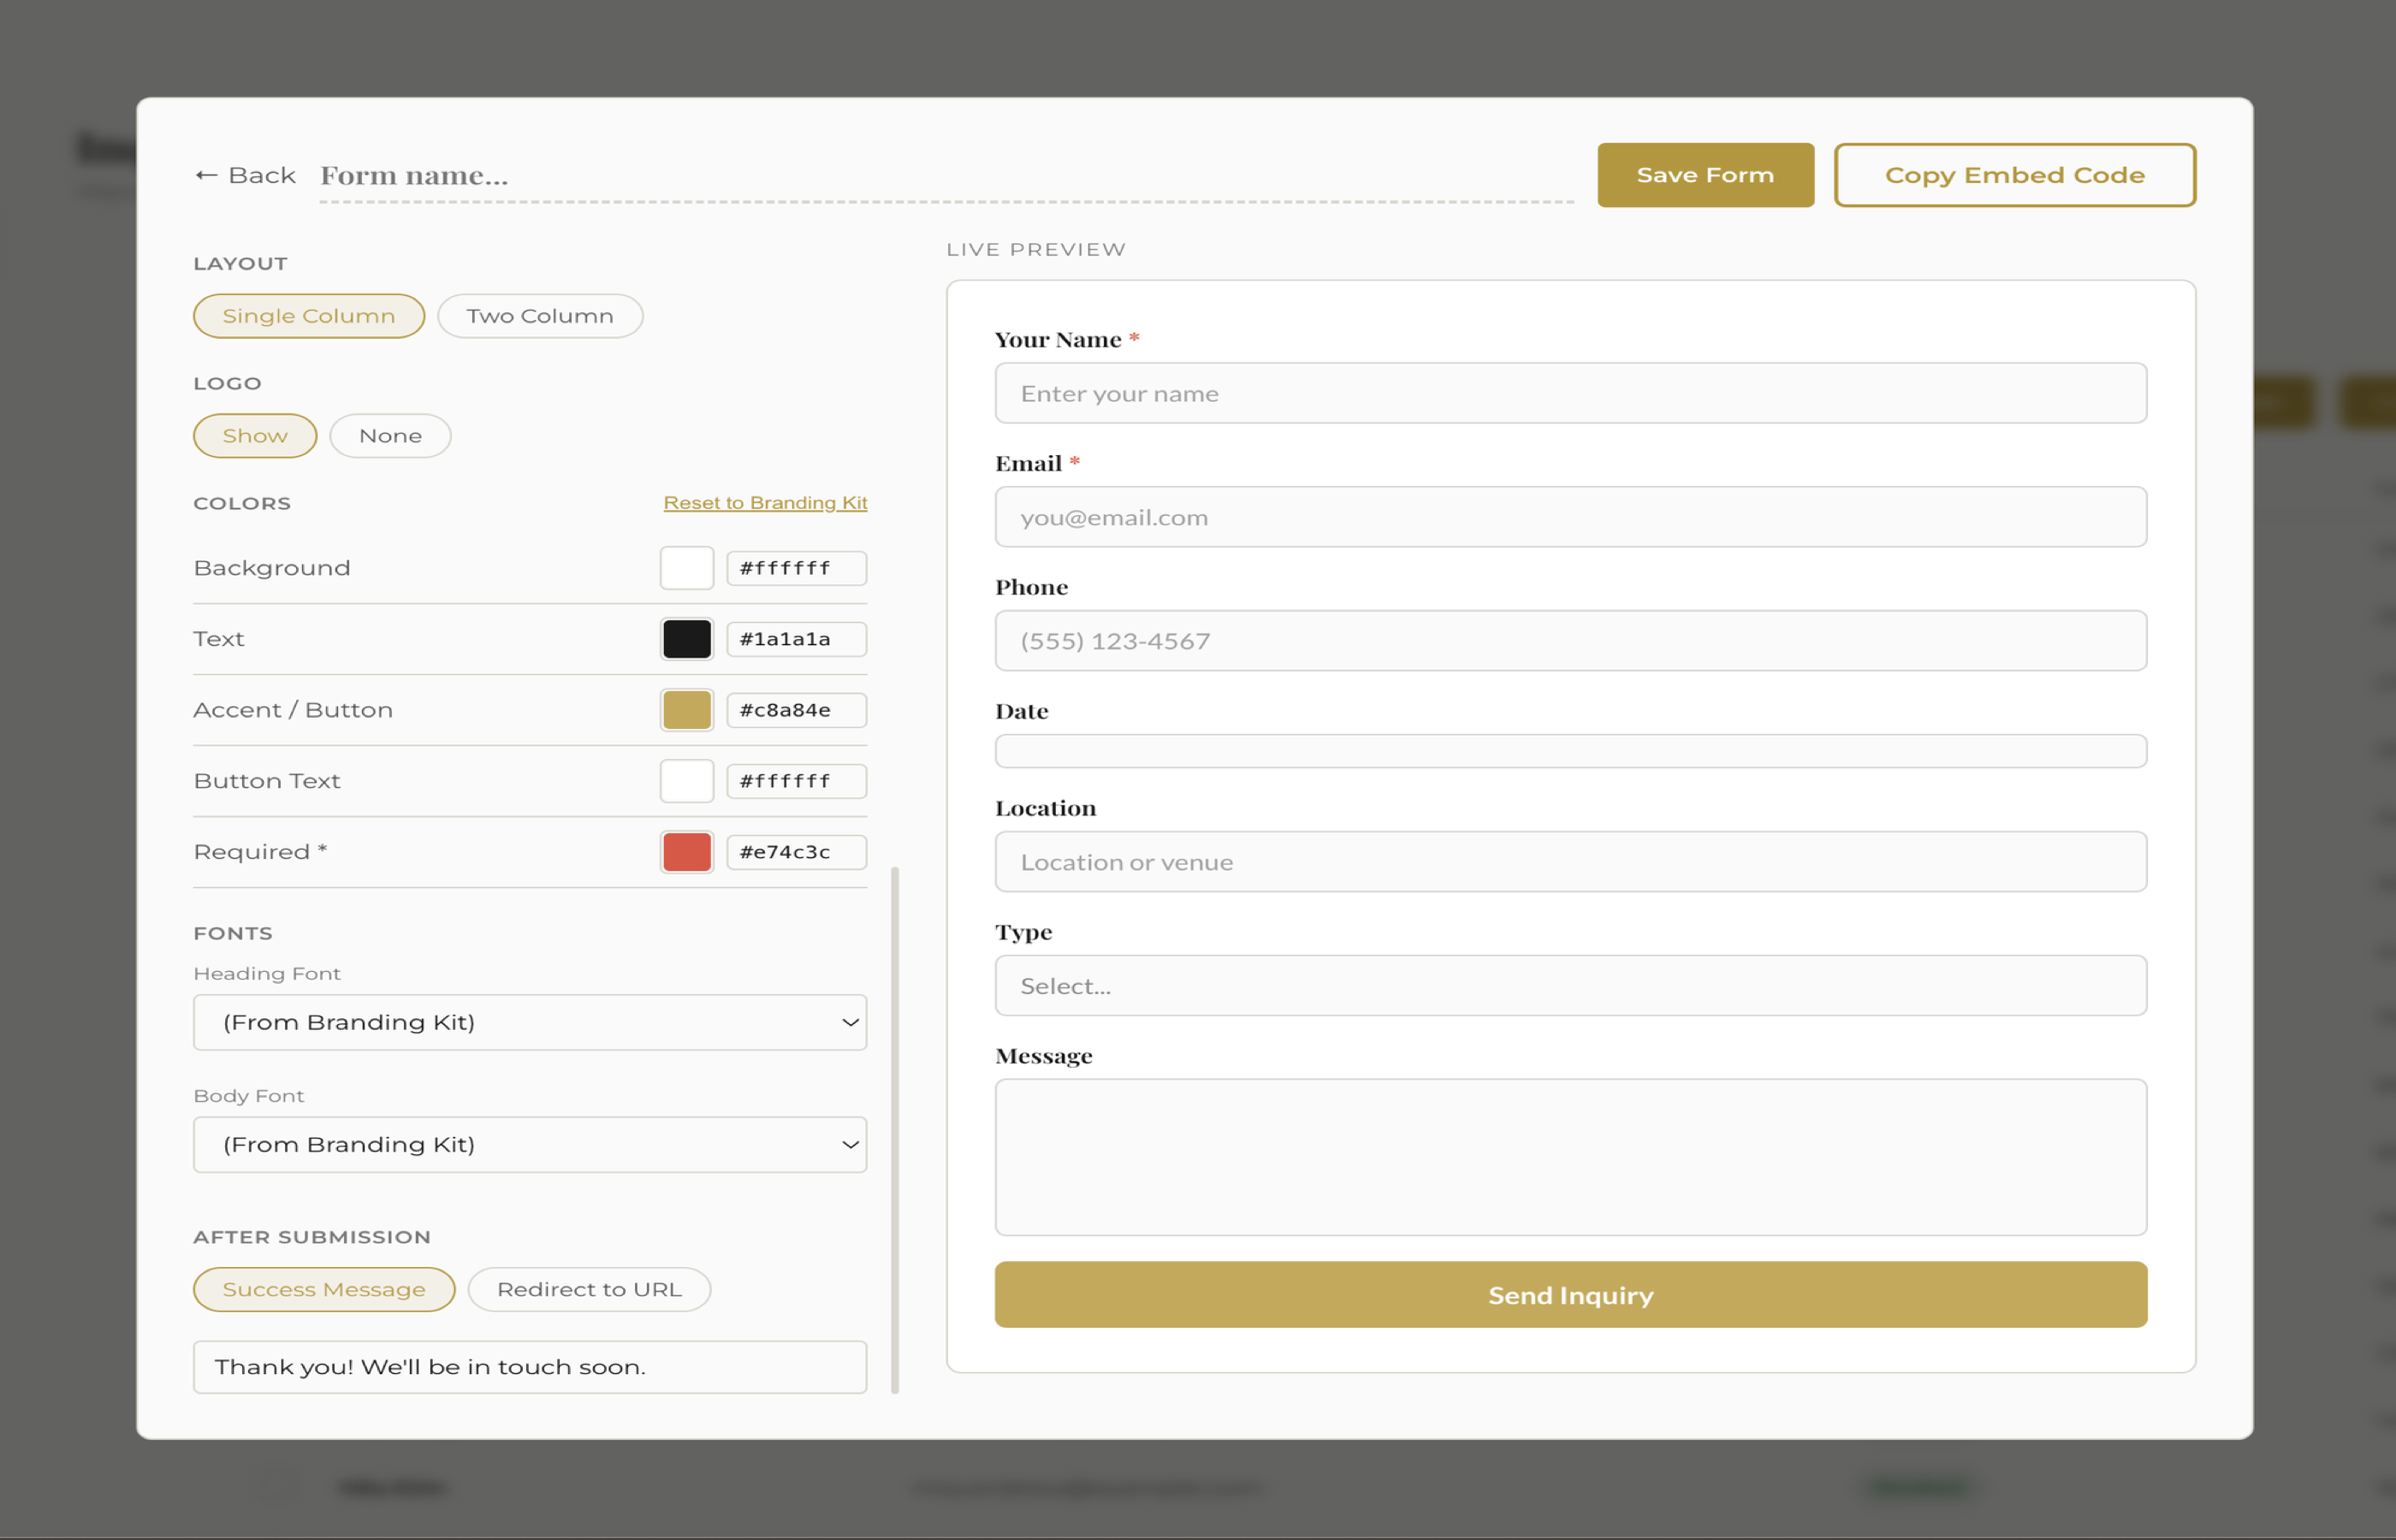
3 Style Your Form
This is where you make the form look like it belongs on your website. The styling panel gives you control over:
- Field styles: Rounded, underline, or boxed
- Button shape: Pill, rounded, or square
- Button fill: Solid or outlined
- Custom button text: "Send Inquiry", "Get in Touch", "Let's Chat" — whatever you want
- Layout: Single column or two columns
- Logo: Show or hide your business logo at the top
Then dial in your colors. Fstop gives you five color pickers:
- Background — match your website's page color
- Text — your label and input text color
- Accent — field borders and focus highlights
- Button text — the text color inside your submit button
- Required asterisk — the color of the * on required fields
Finally, pick your fonts. Choose a heading font and a body font from 17 Google Fonts. If you have already set up your branding kit in fstop, you can click Reset to Branding to pull in your brand colors and fonts automatically.
Field styles, button options, colors, and fonts. The preview updates live so you can see changes instantly.
4 Set Your After-Submit Action
When someone fills out your form and hits submit, what happens next? You have two options:
- Success message: Show a custom thank-you message right on the page. Something like "Thanks! I'll get back to you within 24 hours." Simple and effective.
- Redirect URL: Send visitors to a specific page after they submit — a thank-you page, your portfolio, or a booking calendar. This is also useful if you are running Meta ads and want to fire a conversion pixel on a specific URL.
Running ads? If you are tracking conversions with Meta Pixel, use the redirect option. Point it to a dedicated thank-you page with your pixel event, and you will get accurate conversion data on your ad spend.
5 Copy and Embed the Code
When your form looks right, click Copy Code. This generates a single self-contained HTML+CSS+JS snippet. There are no external dependencies, no scripts to load, nothing that can break. The code is scoped with a .fstop-form prefix so it will not interfere with your website's existing styles.
Now paste it into your website. Here is where to put it depending on your platform:
Squarespace
Edit the page where you want the form. Add a Code Block (under "More" in the block menu). Paste the fstop code. Save. Done.
Wix
Open the Wix Editor. Add an Embed / HTML element to your page. Paste the code into the HTML box. Resize the element to fit your layout.
ShowIt
Drag an Embed Code widget onto your page. Paste the fstop snippet. ShowIt does not have native webhook support, so the embed form is the best option here.
WordPress
Edit your contact page. Add a Custom HTML block (in the block editor). Paste the code. Update the page.
Regardless of platform, the form is fully mobile responsive. It will stack fields on smaller screens and adjust spacing automatically.
What Happens When Someone Submits
Every submission lands in your Inquiries inbox in fstop, instantly. The lead is created automatically with all the information they filled out. From there you can:
- View the full inquiry details
- Send a templated reply in one click
- Move the lead through your pipeline
- Convert them to a client when they book
If you have automations set up, fstop can also send an instant auto-response as soon as the inquiry comes in — so your leads hear back in seconds, even when you are on a shoot.
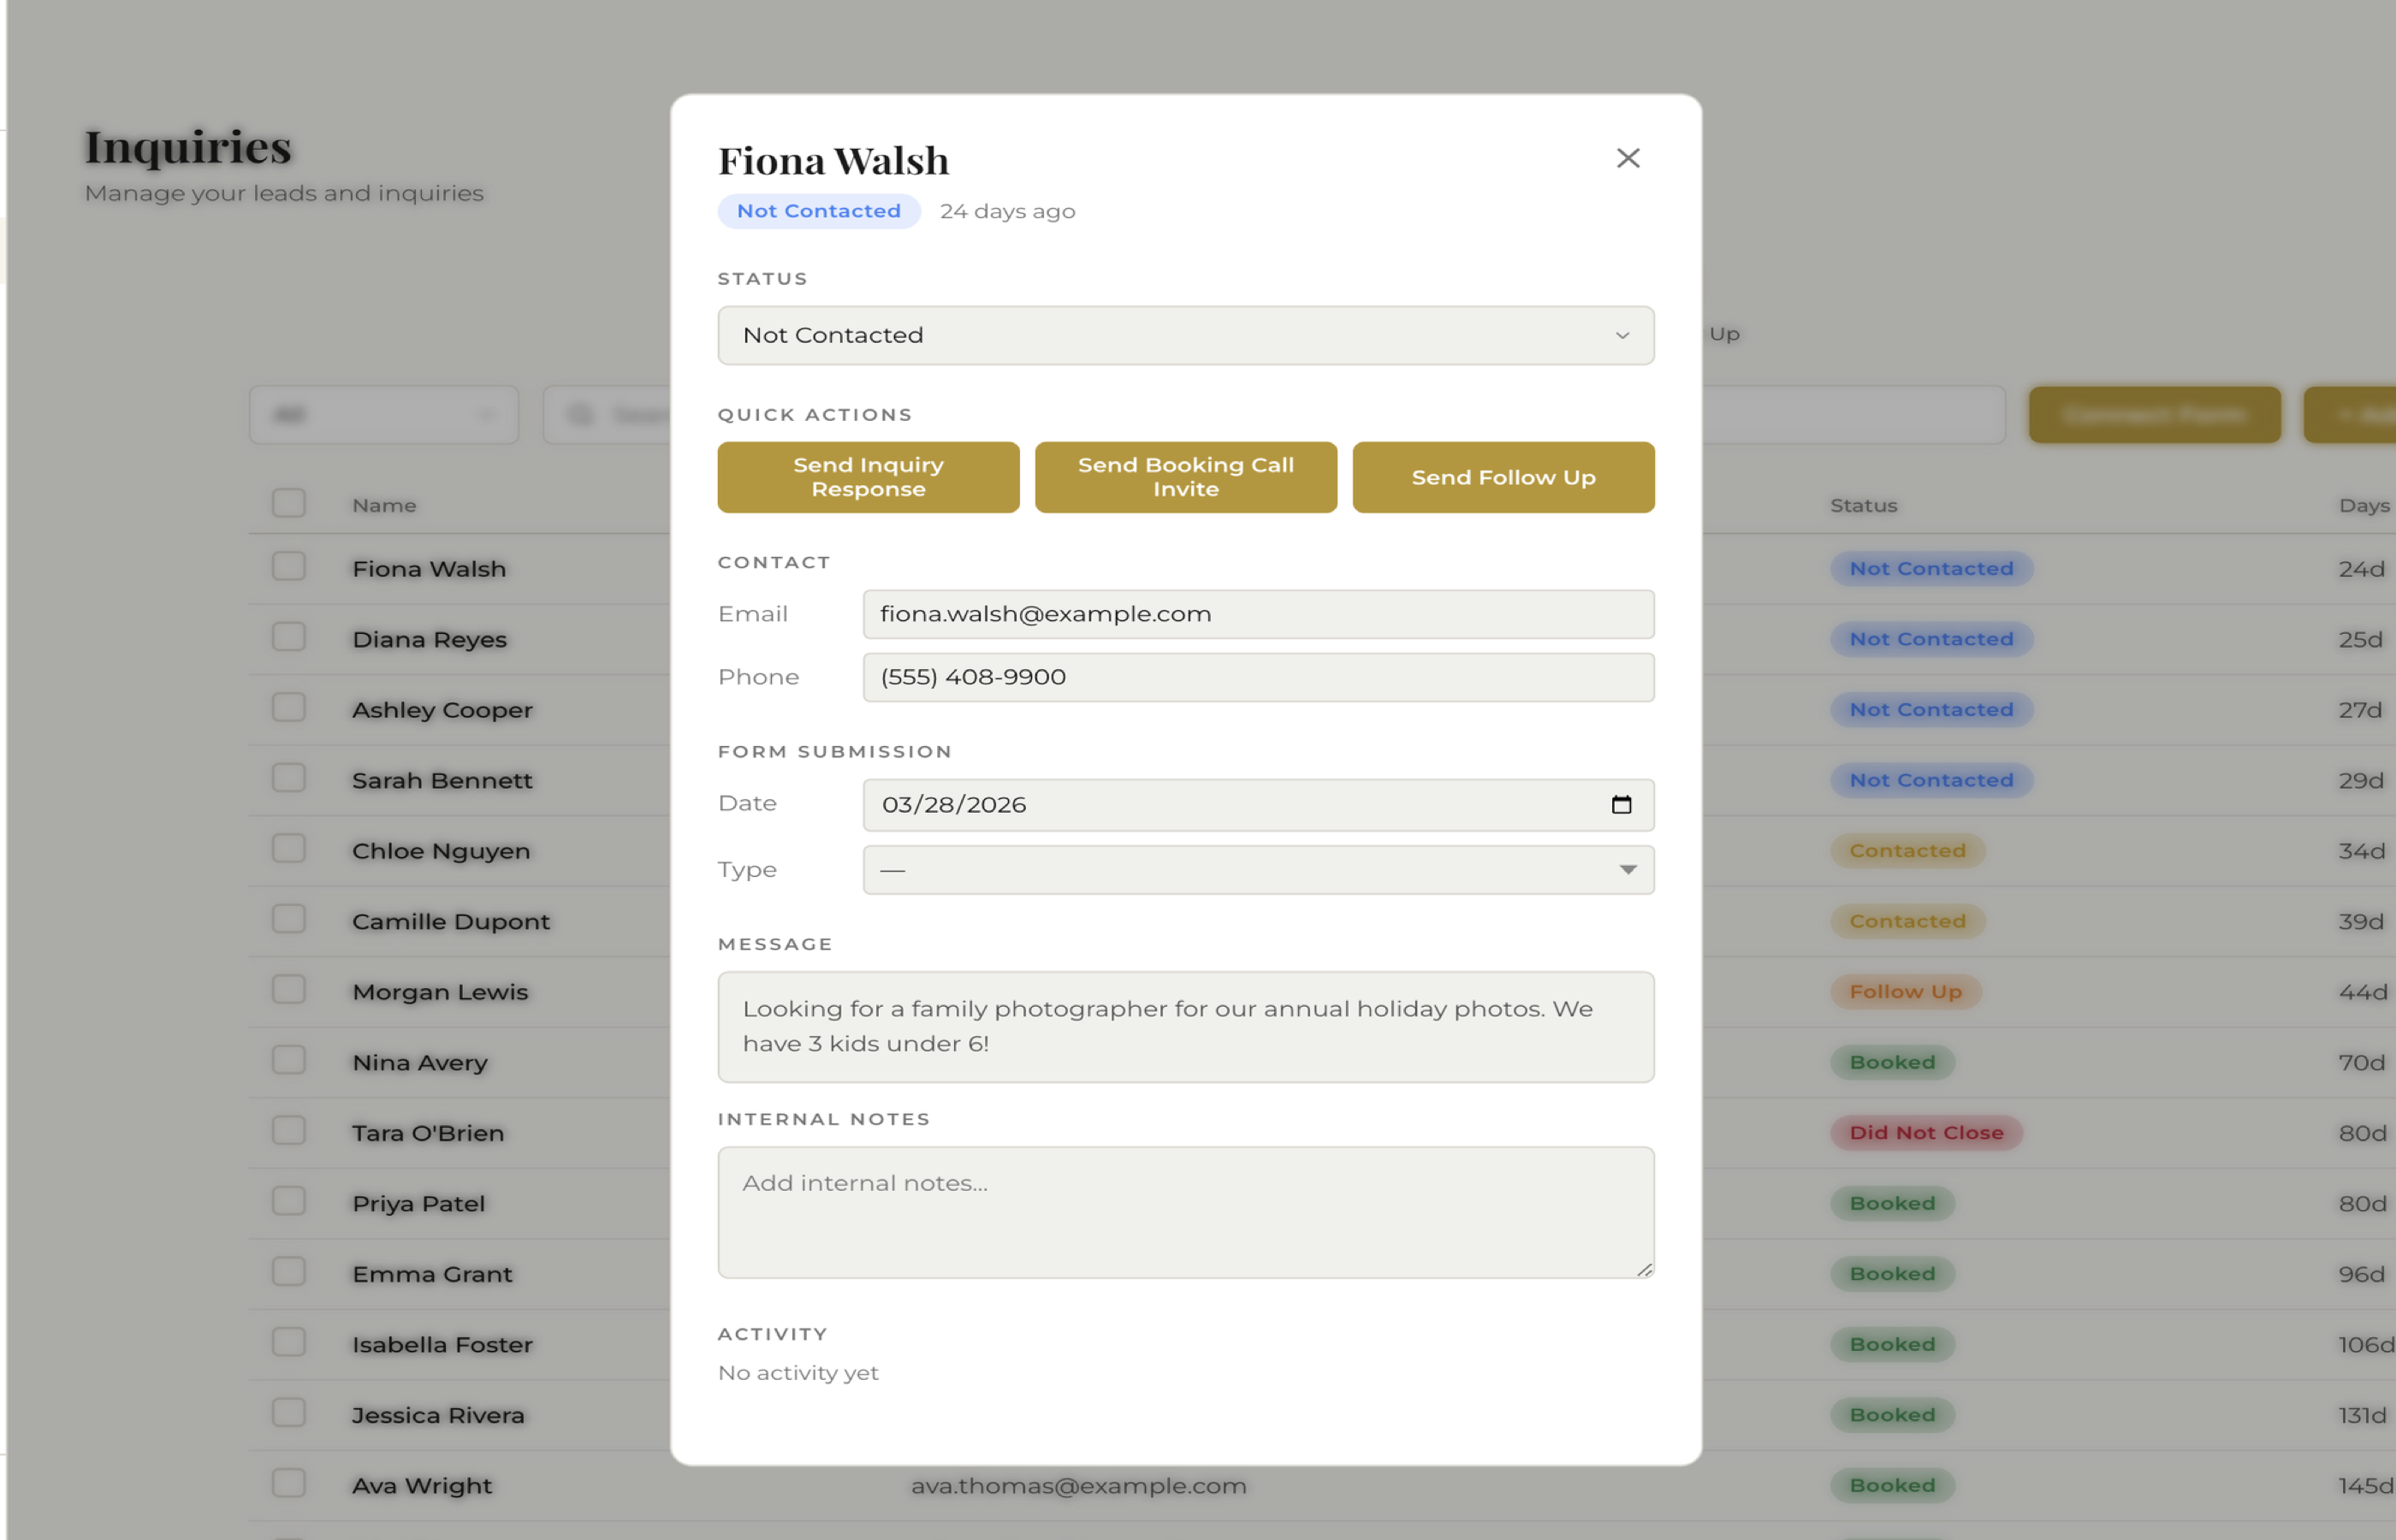
Every form submission creates a lead with full details, ready for you to respond.
The Alternative: Webhook URL
If you prefer to keep your existing website form (maybe your Squarespace form matches your site perfectly), you do not have to use the embed form. Instead, copy the webhook URL from the Connect Form modal and point your existing form at it.
- Wix: Use Wix Automations — add a "Send via webhook" action triggered on form submission.
- WordPress: Use Contact Form 7 with the free "Contact Form to Any API" plugin.
- Squarespace: Use a Zapier integration to forward form submissions to the webhook URL.
Both methods end up in the same place: a lead in your fstop inbox, ready for follow-up.
Build Your Contact Form
Design a branded form in minutes, copy the code, and embed it on your website. Every inquiry flows straight into fstop.
Start Your Trial